


Victoria 2 in laymans terms: The basics.
It is strongly recommended you play the in-game tutorial before you read this guide, as it will familarize you with the very basics like the HUD, the world map and mapmodes.
Introduction
Many guides exist on Victoria 2, and many of them are good guides, however, many fail to explain other nuances in the game, or they over-explain it, blinding the reader with science so to speak. This guide is meant provide a simple rundown of the games fundamental mechanics, without getting too techincal, and breaking down the most important things you need to know before getting into the more intricate systems, featured in the next guide. The information provided in this guide is universally applicable to all nations, and with this information in mind, you should be able to understand the core systems of the game. Once you understand these, the rest of the game becomes much more clear.
Basic Concepts
In this guide, I will go over the fundamental cornerstones of the game which are absolutely neccassary to know. These include provinces, states, POPs, industry and more. In no paticular oder, let's start with provinces and states..
Provinces and States
In Victoria 2, the world map is made up of thousands of provinces, which are owned by nations and represented by a colour, or are uncolonized and just blank. Provinces are where your POPs live, where resources are gathered, and where some buildings are built. A state on the other hand, is a collection of provinces, and national focuses and factories are set and built on the state level. So for example, instead of building factories in every province, like you would with a railroad, every state, regardless of size has a capacity for eight factories. In wars, you can annex territory by using the Aquire State casus beli, which will annex the whole state instead of one province. Provinces have their own terrain and they provide different modifers which can be viewed by hovering over the province. A jungle for example, provides an attacking penalty for the attackers and a defence bonus for defenders. Plains terrain will provide neither. Some terrains also increase the cost of construction, again like jungles and mountains.
Resource Gathering Operation (RGO)


RGOs represent your nations natural resources, and the procurement of said resources. RGOs work on a provincal level, and every province produces one and only RGO. In total, there are 20 RGOs, and throughout the game, provinces can sometimes change their RGO, depending on the nations technology levels, however most provinces carry the same RGO throughout the game. RGOs are the lifeblood of trade and manufacturing, and the world economy is based on the buying and selling of these RGOs. In essence, RGOs are the inputs for your nations factories, and from those inputs, better profitable goods are made. For example, a steel mill requires iron as an input, and steel is essential in almost all industrial manufacturing, so iron RGOs provinces are incredibly valuable, much like coal.
Some RGOs like wool and grain are not paticularly valuable, however they are still vital for meeting your POPs basic and life needs, because not fullfilling those will cause trouble later down the line. So even a seemingly worthless grain producing province is not entirely useless. Tea and opium are similar too, except they have no manufacturing uses, however they are valuable cash crops and many POPs need them to fulfill their luxury needs. Knowing how to utilize your RGOs to their full potential is one of the most important steps in becoming an industrial super power.
RGOs output and employability can be increased via industrial technology, and its highly recommended that you research industrial technology to get the most out of your RGOs before fully commiting to building factories. If you're not producing sufficent amounts of a resource, the factory will be forced to buy from the world market, increasing input costs and lowering profitability. Having all the goods you need produced in sufficent amounts, within your borders or by a sphered nation, will save huge amounts of money and will allow your factories to truly flourish.
Another factor in getting the most of out of your RGOs is the population in a province. It's all well and good owning lots of precious metals RGOs, however, if there is a tiny population working there, they won't huge amounts of money. The Caozhou province in China is regarded as the most overpowered province because it produces precious metals, and has over a million workers. Owning just that one province is essentially printing money, especially with the right technology. Building factories in states with heavily populated, relevant RGOs is highly recommended, because essentially the more people working in that RGO, the more it produces. There are alot of calculations in play but the gist of it is, more POPs=more produce. It's better to have a handful of highly populated type of RGO, than many underpopulated ones.
Special RGOs
There are 3 types of RGO which are considered special because they don't spawn at the beginning of the game, and they function differently. They are as follows:
 Oil
Oilis a limited resource found only in a handful of provinces. At the beginning of the game, oil does not exist, and can only come into existence by meeting certain criteria. The owner of the province (or sphere-master) must have Daimler's Automobile invention, which can be obtained via Combustion Engine technology, Cracking invention, which is from Organic Chemistry tech and/or Protected Cruisers invention, from Steel Steamers tech. Also, the year must be at least 1870, and for some provinces, 1927. Oil is used to make fuel, which is in turn used to produce and maintain late game units like battleships, tanks and aeroplanes.
 Rubber
like oil, is a limited resource found only in certain parts of the world. Like oil it cannot spawn until 1880, and the province owner (or sphere-master) needs the appropiate inventions and technology (Daimler's Automobile invention (from Combustion Engine tech), Edison Light Bulb invention (from Electricity tech), Infiltration technology, or Aeronautics technology). Rubber is used the manufacturing of automobiles, tanks, electrical gear and other late-game goods.
 Precious Metals
represent your nations gold, silver and diamond mines. They are not used in the production process of any good. Instead, it is converted directly into money and goes straight to the government (You). It essentially creates money, and all of the worlds money comes from Precious Metal RGOs and events. Having a populated precious metal province is a guarnteed money maker, with little effort on your part.
Trade, simplified.
Trade in Victoria 2 seems quite daunting, and it kind of is, however, trade can largely be left for the AI to handle. Somethings are simply out of your control, like if the price of a good crashes, or shoots up. Its part of the beauty of this game. The economy is by far the trickiest part to wrap ones head around, but I will try to cut through all the unneccassary details and explain the most important aspects.
Trade Screen
Below is a picture of the trade screen containing reference letters. Read all these carefully.
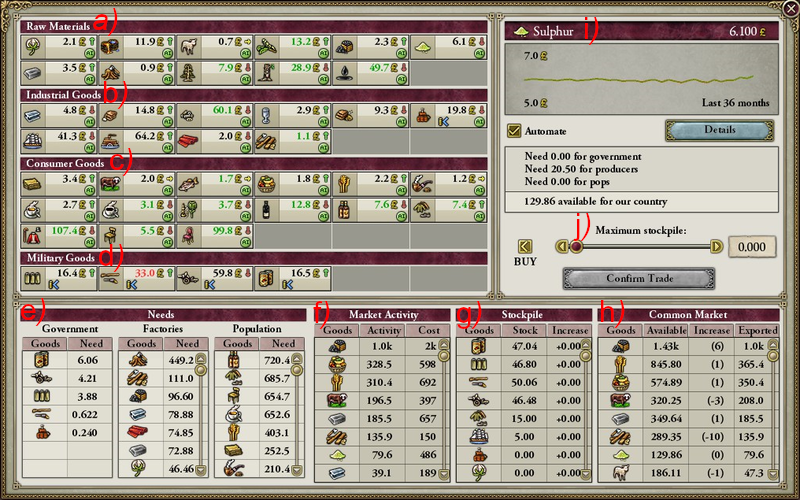
a) This is where you can see the current prices of raw materials, which are gathered from RGOs. Hovering over any good will show you the top 5 producers, and your current percentage of the global supply of said good.
b) This is where you can see the current prices of industrial goods, which are goods made in factories using RGOs. Hovering over any good will show you the top 5 producers, and your current percentage of the global supply of said good.
c) This is where you can see the current prices of consumer goods, which are used to meet the needs of your POPs. Some of these goods come directly from RGOs, whilst others, like luxury furniture, need to be manufactured in factories.
d) This is where you can see the current prices of military goods, needed for the recruitment and maintenence of your army. Notice that instead of a green AI icon, it has a different one. That is because instead of letting the AI handle trade on those paticular goods, the user has instead opting it to trade it manually, which essentially means that they are building a stockpile of those goods, useful in the event that there are shortages, which is usually the case when great powers like Russia mobilize. Manual trading can be used on any good, to buy or to sell.
e) Here you can see the needs of your population, factories and government. Factory needs are the inputs required to produce goods, population needs are required to keep your POPs happy, and government needs are for your military and construction projects, if you have any on-going.
f) Market Activity shows every good imported and exported in your country. That section can largely be ignored.
g) This shows what the government (You) currently has in its stockpile. If you let the AI handle all trade, generally you won't have anything in your stockpile, as AI only buys what it needs and no more. It can be useful to stockpile military goods, especially as a nation with lower presitge, however it is not vital.
h) This shows all the goods produced within your country and how much is available and exported. Goods produced in nations in your sphere also appear here, as the common market is your country and your spherelings.
i) This shows the price of a selected good, and its changes within the past 36 months.
j) Here, you can manually buy and sell goods. As said earlier, AI can handle your trade for you, so its best to leave this section alone unless stockpiling military goods.
By and large, the trade screen can be ignored entirely, however it is still good to know your place in the world of commerce, and it's also handy to know what your competitors are doing. Just like real business, you should stay ahead of the curve and know your surroundings.
Prestige and the world market
Your ability to buy goods is dictated by not only being able to afford them, but having a high enough prestige rank to get them first. Essentially, having higher prestige (and overall score) gives you first dibs on goods traded in the world market. For example, if I am playing as Transvaal, and assuming I'm not in Britains SOI (sphere of influence), and I needed lots of iron for a steel mill, even if I could afford that iron, it would take a long time to actually aquire the iron because of Transvaals low rank. The top 16 powers will usually not face this problem, however nations below that can frequently have issues gaining needed resources because of their low prestige and overall rank. It is this factor that prevents tiny countries from becoming powerful overnight. As with most of aspects of this game, there is alot of complicated calculations happening behind the scenes which dictate who gets what, but the gist of it is, higher rank and prestige=more priority on the world market. For nations with low POPs, its recommended to research pretige gain technology, as it is a quick way to gain rank without spending money.
This is why as a small power, you should always try to get into a great powers sphere, because being in their sphere, no matter how low ranked you are, gives you access to their common market, which means you get first dibs on their goods, even before the world market.
Spheres of Influence (SOI)
SOIs are when a great power absorbs a smaller nation into its market. Only great powers have SOIs, and other GPs cannot become sphered. SOI is a more peaceful way of conquering the world, as it can act as soft imperialism. By having dozens of small countries in your SOI, you gain access to their goods first and the sphered nation is more likely to accept diplomatic requests. Nations can be sphered by adding influnce points into a nation through the diplomacy screen. Influence slowly builds up, depending on how much priority it has. So for example, if I give Sokoto 1 priority and Egypt 3, influencing Egypt will be quicker. You can further increase the speed of influence by investing in railroads and factories (if their government allows it) in the targetted country, and by having good relations. After reaching 50 influence, you can spend that influence on increasing their opinion of you. Opinions go from Hostile, Opposed, Neutral, Cordial and Friendly. Most nations will start as neutral. A nation cannot be sphered until they have a Friendly opinion of you, AND if you spend 100 influence points. Some nations become contested, and get other great powers trying to influence them too. It's a good idea to let influence build up to 100, as by then, it will automatically decrease everyone elses influence. Once that is done, you can then increase their opinion of you, and still have 50 influence points left.
Nations come in different tiers too. Ranging from Uncivilised Nations, Civilised Nation, Secondary Power and Great Power. All but great powers can be sphered, and depending on the nations tier, they offer a different share of their goods. Uncivilsed nations give you a 100% share of their goods, wheras civilised nations give 75%, and secondary powers give 50%. It is an optimal strategy to sphere Asian and African uncivs because of their vast POPs and rare resources. If for example, I have a textile factory, that requires cotton as an input, it would be smart to sphere a nation like Egypt which produces a chunk of the worlds cotton. Since they are uncivilised, we would get 100% of their cotton exports first, thus giving us a defacto monopoly on the textile industry.
The Budget Screen 
The budget screen is where you decide what to spend your nations money on. It is also where you can adjust taxes, tarriffs and take loans. It's a good idea to tweak all of these to your liking before unpausing the game. Below is a picture of the screen with reference letters. Read each of these carefully.
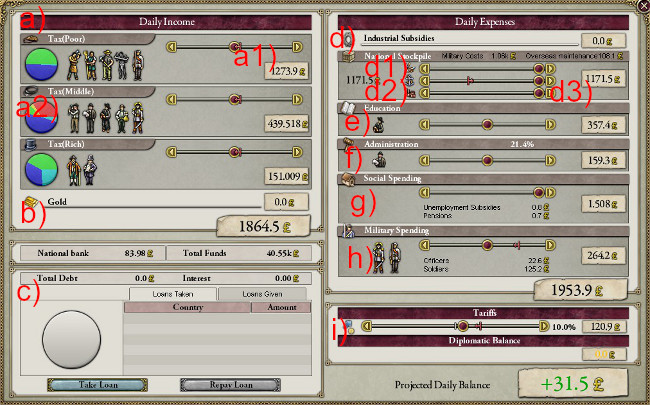
a) Here is where you can set tax rates on your populace. You can tax the lower, middle and upper classes at different rates, it is entirely up to you.
a1) The red line in the middle of the tax slider indicates that the group is not allowed to be taxed higher, or lower than 50%. This can happen in certain government types, like liberal governments, where tax is never more than 50%, which can cripple your economy.
a2) These pie charts show what your POPs needs are, if they are being fulfilled. Hovering over the piecharts give you a breakdown of what they need.
b) Gold is represnting the income you make from precious metal mines. Many countries do not have these, so don't be surprised if it says zero. It's nothing to worry about.
c) Here you can take loans, repay loans and see who is in your debt, and vice versa.
d) Here you can adjust the amount of money spent for goods needed in your stockpile, and above that, you can see how much you are spending on industrial subsidies (where you are covering the costs of running a factory instead of the capitalists.)
d1) This is the military stockpile slider. Having it high up allows you to spend more money on goods needed by the military. In war time, it is essential to have this on maximum because you can reinforce and build new troops quicker, at a great cost however. When the slider is very low, armies will not get the goods they need and they will suffer in combat and have less organisation.
d2) This is the navy stockpile slider. It works the same way as the military slider, except for some countries, there is a minimum amount you need to spend, hence the red line. Lowering navy maintenence is a good way to save money in peacetime, as navies are incredibly expensive to maintain constantly.
d3) This is where you can adjust how much you spend on construction. It is recommended to keep this high at all times, so you can get the resources quicker and get buildings built quicker.
e) This is the education slider, which pays for your nations clergymen, who increase the nations literacy. It's recommended this also stays at maximum, at least until you're at very high literacy. Having the slider too low will cause clergymen POPs to demote.
f) This is the administration slider, which pays for your nations civil service (bureaucrats). High spending increases their administrative efficency, which increases tariff revenue, crime fighting efficency and tax efficency. This is a very expensive slider, however it is essential to at least keep it at half, because of all the benefits it gives.
g) This is the social spending slider, which covers pensions and unemployment subsidies. If you have not passed those reforms, the spending will remain at zero, regardless of where the slider is. If you have passed these reforms, the subsidies can keep unemployed POPs happy by paying for their needs, however this gets very expensive. Most of the time, you will want to keep this at a minimum, and if you keep unemployment at a minimum, you won't have to worry about this slider.
h) This is the military spending budget. Soldiers and officers wages come from this, and having a high military spending will mean more recruitable soldier POPs. Lower means less, and if they aren't getting paid enough, they won't be able to afford their needs, which can cause rebellion if not rectified.
i) This is where you can set your tariffs. Tariffs are a tax on every good that is imported and exported, and it can bring in lots of money for the government. However, high tariffs means POPs cant afford their needs, unless your country can provide everything in sufficent amounts, which is highly unlikely for most countries. Use these at your discretion.
Production 
In this section, I will cover the basics of industrial production, and offer some helpful tips for squeezing the most out of your nations factories. To begin, let's start with laying the foundations, with railroad tracks.
Railroads
Railroads are an integral part of any nations supply chain, and without them, progress will be slow, gains will be lower and your production is far less efficent. Unlike factories, railroads are built on a provincal level, however you can Ctrl+left click on the Build Railroad button and that will build railroads in every province in the state, provided the terrain is suitable. At the beginning of the game, many nations won't have railroads at all, and the ones that do, will only have level 1 railroads. Level 1 railroads cannot be built on terrain like mountains, jungles and forests, so it is important to research better railroad tech frequently. Railroads provide massive bonuses per level, like increasing RGO output by 16%, factory throughput by 16%, as well as decreasing troop movement cost by 5% per level.
When increasing the levels of railroads in your empire, the effects become immediatedly apparent. At the beginning of the game, you should pay attention to where you're actually building them, as building them in isolated, low POP provinces at the beginning is rather wasteful. Ideally, you will build them in states where you know you are going to place lots fatories later, so by the time those factories are built, they will already be getting hefty bonuses. Even in states where you are not building factories, they are still incredibly powerful when built in rich RGO provinces, especially if that RGO is in high demand, like coal.
Railroads are especially useful for speeding up troop movement. In vast countries like Russia, getting from the west to the east without railroad can take months, and it leaves you in a massively vunerable position. If you own large amounts of territory in Africa, it is useful to build railroads there too for the same reason, as well as providing nice bonuses on the high demand African RGOs.
Capitalists can build railroads without costing you a dime, however it is much quicker to do it yourself in strategically important areas. Overall, it's good to have at least one railroad in every province by the end of the game.
Appropiate Technology
Before you actually begin to place your factories down, it's important that your nation can actually produce the resources needed for factory input in large amounts. You will end importing some input, that's normal, but the point of researching these industrial techs is minimize importing and maximise utilising your own resources, as this saves money and allows your industries to actually turn a profit. Important industry techs include the Mechanization subcategory, as it allows you to build a machine parts factory, which is necessary input for every factory in the game. At the beginning of the game, few machine parts exist and only Britain and a couple others produce them, so its important to research this. The mechanization subcategory also massively increases RGO and factory output and throughput.
Metallurgy is another important subcategory in the industry tech school because it allows the construction of steel mills which produce steel, another incredibly important resource. It also allows military factories like small arms, explosives and artillery. Other techs in this subcategory increase coal and iron output from RGOs.
Infrastructure is the subcategory that allows you to build railroads. Each tech in this subcategory lets you build higher level railroads.
Power is in my opinion, one of the most important technology subcategories in the game because with each level, it increases mining and farming output by 5-20%, which is a ginormous bonus for largely agricultural nations. I recommend you invest heavily in this subcategory if you're playing tall.
Another incredibly useful subcategory is Chemistry and Electricity, as it allows the production of electrical gear later on in the game, as well as synthetic dye, and dye is a rare resource at the beginning of the game, with the British having a total monopoly on it thanks to their Indian territories. Researching this subcategory also allows increases POP growth and it is a cornerstone tech for colonialism (more on this later).
Some commerce technologies are also helpful as they increase factory output and throughput, though these are optional as the bonuses are rather minimal.
With these technologies in place, you should have a decent foundation for industrial growth. One more thing a lot of players forget is that in order to promote craftsmen (factory workers), your nations overall literacy needs to be at least 30%, and there needs to be a factory in construction or in existence, in your nation. POPs will promote to craftsmen if these conditions are met AND if they are getting their needs.
Factories
Now that you have laid the foundations, its time to build. Factories are built on a state level and can be accessed in a macrobuilder in the production tab. Depending on your government type, you may or may not be able to build factories. State capitalist and planned economy governments can build and close factories as they please, but others cannot and have to rely on capitalists to build them. In the early stage of the game, this is quite bad because they almost never build profitable factories in the right areas, however later on in the game when you have industrialised properly, its not too bad to let them build, as by then, your industry should be big anyways. Also, laise-faire governments provide huge production bonuses, at the cost of having no control over factory construction.
Factories can employ up to 10,000 people, and this increases by 10,000 each time it is upgraded. When upgraded, it increases production output as well as the required input. The factory employs craftsmen and clerks, and it is recommended to balance factories at around 80% craftsmen and 20% clerks for maximum efficency bonuses. If your government is state capitalist or planned economy, you can manually upgrade factories, or upgrade them all by pressing Shift+left click.
Before building your factories, you must take into account a few things. Assuming you've built railroads in states with appropiate RGOs and decent sized POPs, you should build them there. But also, you should only build factories in states where the required input good for the factory is in the state, because it provides an input efficency bonus and an output efficency bonus. Input efficency means it requires less of the required good. Output efficency means it can output more produce with the same amount of input. For example, the state of X has 4 provinces, 2 produce coal, 1 produces iron and 1 produces grain. Therefore, it would be smart to build a factory that uses both coal and iron as an input, like a steel factory. Each state can have up to 8 factories, so you can make huge production chains if you want. Because if you build another factory that uses steel as its input in the same state, the new factory would get an input efficency bonus because it is in a steel producing state. This can snowball as you build more factories in the same state. If you have an automobile factory for example, and most of its inputs are aquired from the same state, the efficency bonuses are fantastic.
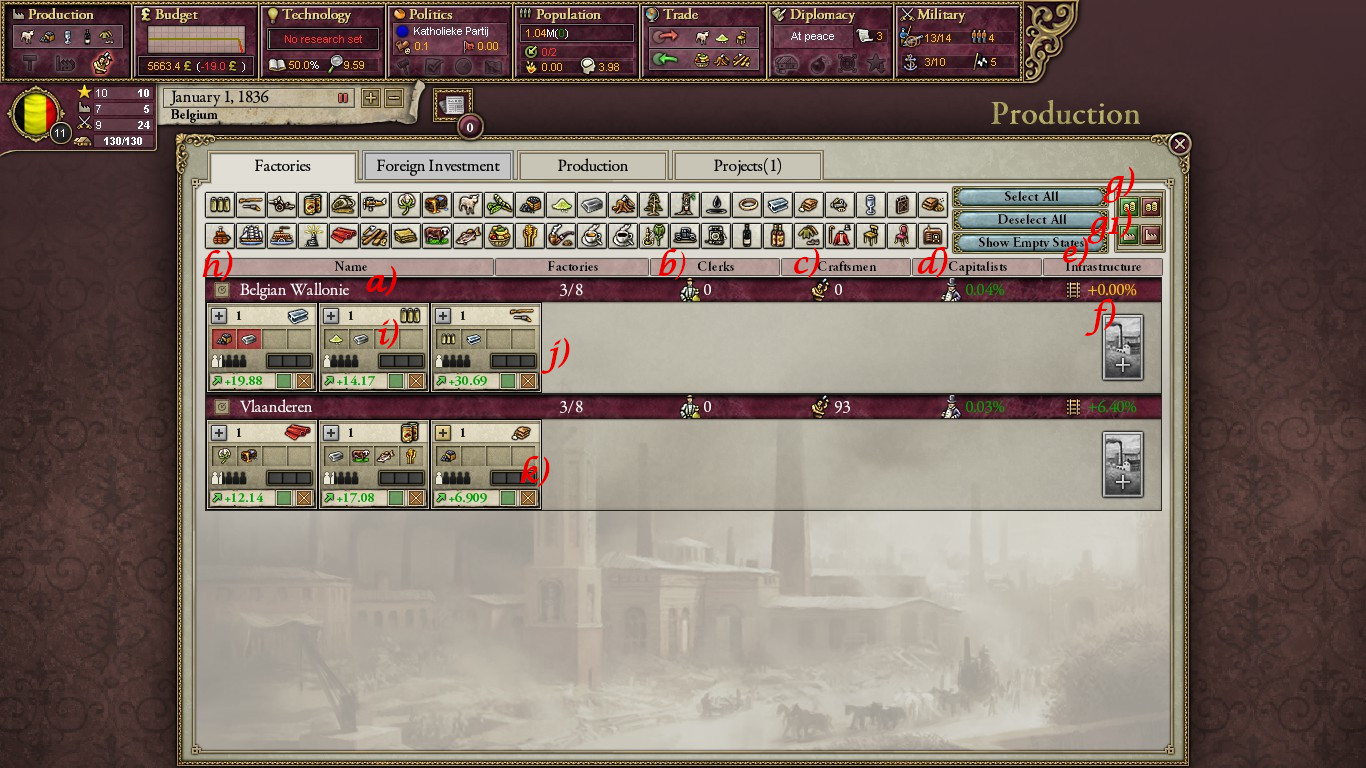
a) This section shows which state the factory is in.
b) This shows the amount of unemployed clerks in that state.
c) This shows the amount of unemployed craftsmen in that state.
d) This shows the bonus that capitalists in the state are providing, if there is any.
e) This shows the bonus that railroads in the state are providing, if there is any.
f) This button lets you build a new factory, if your government allows it.
g) These buttons allow you to subsidise or cancel subsidies on all factories.
g1) These buttons allow you to close or reopen all factories.
h) This button allows you to select a national focus for that paticular state. Useful for quickly promoting craftsmen, clerks or capitalists.
i) These slots are the input slots required for your factory to produce goods.
k) These grayed out buttons allow you to priortise which factory gets workers first.
Technology 
There are five different technology groups in Victoria 2 - those being Military, Navy, Commerce, Culture and Industrial. Each of these techs have 5 subcategories, with 6 techs in each subcategory. Technology is gradually unlocked as the years go on, so you couldnt research electricity in 1836 for example. A frequently asked question is which techs to prioritse first, and you will always hear the same answer - "it depends." Because that is the correct answer. If you're playing aggressively and planning on fighting wars against the great powers, prioritising military tech is a safe bet. But at the same time, you cannot lag too far behind in the other techs, as alot of the techs compliment eachother. A landlocked nation would not have to research naval tech at all, unless they plan on annexing a province by the sea.
What technology you choose is again entirely down to what style of play you have. In the later game, having high military tech is essential for going against even weaker powers, because you can unlock the gas attack and gas defence inventions, which adds a massive +3 attack bonus to any attacking army, assuming the enemy has not got gas defence invention. This can be incredibly useful against nations with huge, low tech armies like China and Russia (if they spiral into endless revolution). Other essential technologies include all the industrial techs and for smaller nations, prestige techs to increase your rank passively. The topic of technology is rather big, and there will be a seperate guide later down the line, but all you really need to know is to read the tooltips for each technology, and make sensible choices based on the circumstances of your nation.
Population (POPs)
The POPs system is meant to reflect the ever changing fabric of humanity in the beginnings of the industrial age. As we all know, it was a turbulent time for the world, where populations boomed in some places, and other places it dwindled, as more people moved into the cities for better work. Your nations population is of course your backbone, and they are the backbone of the entire game too. Victoria 2 has crammed the entire worlds population into 12 different classes, or POP types, and we will go over them now.
 Slaves
are at the at the bottom of the social hierarchy in Victoria 2. They are the same as farmers, and they provide a 10% RGO output bonus in their respective province, as well as having no needs. However they do not generate tax income and they cannot promote to better professions, like craftsmen, so keeping slavery legal is generally a longterm loss. Abolishing slavery will turn all slave POPs into taxable farmers who have needs.
 Farmers
for most countries, make up the majority of their population. Farmers represent workers who harvest crops and animals. Unlike slaves, they do not provide 10% RGO output bonus, however, they are taxable and depending on your government type, they can vote too. As well as that, they also have needs. Politically, farmers tend to lean towards conservative and reactionary parties.
 Labourers
represent those who work in mines. They function just like farmers, but instead they lean towards liberal parties.
 Craftsmen
represent the skilled factory workers involved in the manufacture of various goods. When employed in a factory, they increase the factorys input costs, throughput and output. At the start of the game, craftsmen will not exist in countries that start with no factories, which is the vast majority. In order for craftsmen to exist, your nation needs at least 30% overall literacy and at least one factory. Lower lower class POPs will promote to craftsmen more frequently once the foundations for your industry has been set, and all of their needs are being met. Politically, craftsmen lean towards liberal and socialist parties.
 Soldiers
represent the fighting men of your nation. Soldier POPs are required for building brigades. Brigades consist of 3,000 men, however the game only requires 1000 soldier POPs to create a brigade. The other 2,000 men are kept as reserves off screen. When a brigade takes losses in combat, it is represented by reducing the size of that soldier POP until it is reinforced. Reinforcements come from soldier POPs in the province the brigade was created. So for example, I have an infantry brigade which was created in New York, that brigade would be called the New York Rifles. If the NY Rifles take casualties, that brigade is reinforced by soldier POPs in New York, assuming the brigade wasn't wiped out. So overtime, if the brigade kept taking heavy losses, you could in theory drain an entire province of soldier POPs. The amount of soldiers your nation can train and equip is dependent on your military spending budget. If it is low, soldier POPs will demote to other POP types, and other POP types will not promote to soldiers. If the budget is high, soldiers can meet more of their needs and more POPs can promote to soldier, as well as officer. Politically, soldiers lean towards liberal and reactionary parties.
 Artisans
represent high skilled, unorganized workers who produce factory goods in low quantities, by hand. Until the introduction of factories, artisans are the only way of producing factory goods. Artisans will slowly dissappear as your nation industrialises, and they will either demote or promote to clerks who work in factories. Artisans typically get stuck in perpetual poverty since they have to pay for input goods and their needs, and they can usually afford neither. The sooner you can get rid of artisans, the better. Politically, artisans lean towards liberal parties.
 Clerks
represent the paper-pushers in your nations factories. They are paid the same as craftsmen, and they, as the name suggests, take on a clerical role. In order for POPs to promote to clerks, the overall literacy of your nation must be at least 50%. Having 20% of a factorys workers as clerks can increase its output by a whopping 50%, so they are vital for profitable industries. They increase throughput of your factories, as well as providing 0.5% research points per percent of clerks in the country, capping at 2%. Politically, clerks lean towards liberal parties.
 Clergymen
represents your nations educators. They contribute to increasing literacy of your population, as well as a reduction of consciousness, which is useful for keeping your population pacified. They are paid through the education slider on the budget screen. Ideally, clergymen should make up 2% of your nations population for maximum education efficency. It is recommended at the beginning of the game to promote clergymen in your most populated states. Clergymens education efficency caps out at 4% clergymen per province. So if you kept encouraging clergymen past 4%, the POP would grow but you would not get any extra benefits. Politically, clergymen lean towards liberal parties.
 Officers
represent your military leaders. They increase the amount of leadership points a nation gains by up to 3, and officers cap at 0.2% of the nations population. Leadership points are spent on creating generals. Like soldiers, officers will not promote if military spending is low. Officers do not require any micromanagement at all really, and in short, as long as your military spending is high and your POPs have their needs met, officers will promote and leadership points will generate. Politically, they lean towards liberal and reactionary parties.
 Bureaucrats
represents your nations civil service, like the police, administrators and other government jobs. Bureacrats increase the administrative efficency of their repsective state, and the country overall. On the national level, it effects the amount of goods your population requires, doubling it at 0% with normal needs at 100% (more on this later). Bureaucrats also increase revenue from tarriffs and increase crime fighting efficency, as well as building up supression points. They are paid from the administrative spending slider in the budget screen. Low administrative spending means less bureaucrats, which means more crime and less income from tarriffs, as well as less bureaucrats. If spending is high, more POPs will promote to bureacrat and they can afford more of their needs. The most important role of bureacrats is turning colonies into states. Bureucrats are only only effective if they of your nations accepted or primary culture, so bureucrats earned from conquest are usually ineffective. Politically, they lean towards liberal parties.
 Aristocrats
represents the wealthy landowners of your nation. They own the respective RGOs in a province, and they make most of the money on the goods profit, with the rest going to the farmers/labourers who work in said RGO. Aristocrats provide a maximum 2% bonus for RGO output in their province. Politically, they lean towards liberal and reactionary parties.
 Capitalists
represents your nations industrial tycoons and factory owners. Provided they have enough money, capitalists can build factories for much cheaper than the state could, and they provide an input bonus to the factories in their state. As well as factories, capitalists can also build railroads without player intervention and for a fraction of the cost. However, in governemnts with a planned economy policy, capitalists do not build factories or railroads. Capitalists earn their money through the profits of their factories, and they use that money to pay their workers, invest in more factories and railroads, or place it in the national bank. Politically, capitalists lean towards liberal parties, and if you want to pass reforms early, promoting capitalists can help since they have a seat in the upper house right at the start of the game.
Conclusion
Now that you have learned the fundamentals of the game, you can begin to explore the deeper mechanisms yourself. However, if you don't want to do that, you can always check back in at The Obsolete Guide for the next guide, which will cover my favourite aspect of this game - colonization. In that guide, you will learn how start and maintain a flourishing colonial empire. Until then though, happy hunting.